Home » Posts tagged 'ceilings'
Tag Archives: ceilings
Types of Ceilings
Ceilings Perth are an overlooked part of a room that can affect how you feel both physically and mentally. Whether simple or elaborate, ceilings can add beauty and drama to your home.
Once upon a time, plaster ceilings were adorned with borders, cast-plaster ornaments and specialty papers. Could they be ripe for decorative rediscovery?
Wood ceiling beams give a home character and charm that’s difficult to duplicate. A popular choice is a solid-wood beam, but a variety of alternatives are available to suit a range of taste and budgets.
Historically, exposed beam ceilings were a staple of log-home construction. Today, the rustic look of this design style is a desirable addition to both traditional and modern homes. The most obvious advantage of beam ceilings is that they provide a dramatic architectural feature, adding height to the room and making it appear larger. Wood beams also add warmth and texture to the space, enhancing the beauty of natural materials.
Solid wood beams are available in a variety of textures, finishes and colors. They’re often hand-hewn, band saw or smooth-finished. Reclaimed wood beams are another option, and they’re often used to create a more eclectic look in contemporary homes. Wood beams should be regularly sealed and stained to protect them from moisture and sun damage.
To achieve the look of a real timber beam, a homeowner could take down the drywall and expose the ceiling joists. However, it’s rarely worth the effort and expense. A much easier and more affordable alternative is to install faux wooden beams. These three-sided beams are fabricated to look like the real thing, but they’re hollow inside so they can conceal wires or pipes that would otherwise need to be hidden behind drywall.
The most common types of hammer beams are made from squared off boards and connected by nails or screws. These beams are typically used to support the roof of a home or mezzanine, and they can be painted or stained. They’re also used to make a vaulted ceiling more visually interesting by creating a straight line across the center of a room.
Because they’re crafted from wood, exposed beams should be periodically sealed and stained to prevent damage from moisture, sun and insects. Regular maintenance also includes regular inspections to catch any signs of water damage and structural problems, such as warping or cracking. These repairs should be made quickly to avoid the potential for more extensive damage and costly repair bills down the road.
Ply and Batten Ceilings
Plywood might not be the first material that comes to mind for a ceiling, especially when there are so many other options such as gypsum board, plaster of Paris, vinyl and fiber-cement. However, this material offers unique advantages that make it worth consideration.
For example, the fact that it is manufactured by bonding wood veneers from hardwood and softwoods, such as ash, maple, mahogany, Douglas fir, pine plywood, cedar and spruce, means that it is incredibly strong. It also resists impact damage, water and chemicals (though it might not be as resistant as natural wood).
Another benefit of plywood is its flexibility. It can be shaped and cut into different forms and sizes to suit the specific requirements of each design. In this sense, it can create a ceiling that is truly unique and fits the aesthetic of each space. This is precisely what was done in the West Coast Eagles’ home base facility in Lathlain, where a slanted plywood false ceiling was used to create a statement design that reflects the brand and national standing of one of Australia’s most successful AFL teams.
When laying a ply and batten ceiling, it is important to follow recommended spanning guidelines and fastening techniques in order to ensure that the ceiling stays in good condition for as long as possible. As each project is unique, it’s best to seek detailed advice at the outset from a qualified timber specialist.
There are a number of ways to secure ply and batten panels, including a traditional split batten system, which is typically brad-nailed onto the wall. However, for projects that require a more concealed finish, there are now a number of screw fixing systems available. These systems are easier to install and provide a more durable solution than a split batten.
Another option for securing ply and batten ceilings is to use a no-glue nail system such as the Z-Clip. This system is easy to install, has a low profile and is reversible, meaning that the panel can be removed or replaced at any time without damaging the timber.
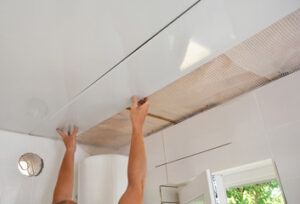
Suspended Ceilings
Suspended ceilings consist of a network of grids and beams that are suspended from the structural ceiling. They can be installed over a range of materials from plasterboard and drywall to wood and metal. They’re popular in commercial spaces because they can hide complex services like electrical wires, insulation and plumbing pipes while providing a clean look to the interior ceiling of the space. They can also be used in residential spaces to improve the look of a room while adding functionality.
They’re also easy to install as they can usually be completed within a matter of days, depending on the design and size of the project. This makes them an ideal option for busy businesses or households that want to add a new ceiling without disrupting day-to-day activity. This type of ceiling can be a good solution for those looking to make their living or working space more comfortable by improving acoustics, as well as reducing the temperature in a room during the summer.
There are many different types of suspended ceilings on the market today, but they all consist of the same basic components. The framework or grid system is suspended from the ceiling with a series of T-bars and cross runners. Ceiling tiles or panels are then laid into the grid system, which is available in a variety of materials, colours and textures.
Many of these tiles are sound absorbing, which helps to reduce noise reverberation and provide an acoustic barrier between rooms. This is particularly useful in offices, hospitals and other business premises where high levels of conversation and distraction can occur. Some panels are even designed to combat sound transference between rooms, which is useful in theatres or auditoriums.
These ceilings can be customised to suit your style and aesthetic, with various tile shapes, sizes and textures available. They can be finished in different colours to help them blend in with the surrounding environment and meet your specific design requirements. They can also be installed in a variety of ways, including being modular and demountable for easier maintenance and access to the space above.
Drywall Ceilings
Drywall ceilings, also known as wallboard or gypsum board, offer a smooth and sleek finish that complements contemporary interior designs. Drywall panels, which consist of a hardened gypsum core wrapped in paper, are fixed to walls and ceilings with glue or drywall screws. Construction workers can hide unsightly pipework, wires or other structural elements with this type of ceiling, which is ideal for modern construction and remodeling projects.
While a drywall ceiling offers a sleek look and a versatile aesthetic, it can be susceptible to moisture damage, making it less than ideal for areas prone to leaks or high humidity. Additionally, drywall is difficult to install correctly, so mistakes often show up as visible seams.
A drywall ceiling can be made from different thicknesses, ranging from 1/2 inch thick to 5/8 inch thick. The thicker option is designed for sturdier residential ceilings and commercial applications where fire resistance is an issue. The thinner option is more flexible and can be used on curved or other uneven ceilings. The thickness of a drywall ceiling will determine its ability to withstand impact and sound.
Prior to installing a drywall ceiling, it is sometimes necessary to add insulation. A vapor barrier can be placed under the drywall, and a layer of insulating foam can be added over the drywall. This helps prevent the drywall from becoming damp, which can cause mold growth and other problems.
When framing a ceiling for drywall, it is important to install the sheets perpendicular to the joists. This will help reduce the chances of butted seams, which are typically harder to conceal than tapered or corner joints. When a damaged drywall ceiling needs repair, it is essential to first mark off an outline of the damaged area and remove any existing drywall that has fallen over the edge of the joists.
After repairing or replacing the damaged drywall, it is essential to cover any screw holes with a layer of joint compound, which can be spread with a drywall knife or trowel. This compound will fill the holes and can be sanded down before painting.
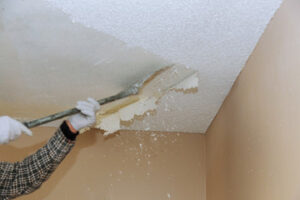
Ceiling Repair – Why You Should Hire a Qualified Professional
A cracked or damaged ceiling can be a serious issue and requires professional repair at Ceiling Repair Perth. A few hairline cracks and some small holes are not a big deal, but damp patches indicate a leak or mildew.
Small cracks in drywall can be repaired with setting-type joint compound, sometimes known as drywall mud or Spackle. Large cracks are a sign of structural damage that needs to be addressed quickly.
Cracks in ceilings can be a major pain in the neck to deal with. However, if you are able to identify the source of the crack, it is possible to fix these issues and prevent them from becoming worse. This is especially important because structural damage from a ceiling crack can cause other problems throughout the home.
Cracks can develop in drywall and plaster for a variety of reasons, including normal house settling, faulty workmanship, roof truss uplift, or water leaks. Fortunately, savvy homeowners can usually repair these cracks by following some time-honored techniques. However, it’s always best to contact a professional for more serious cracks in the ceiling.
A few hairline cracks in the ceiling are typically not a major concern, and are often caused by paint build-up or plaster expanding and shrinking due to changes in humidity. However, cracks that are long and run in a continuous line from one side of the room to the other are indicative of serious issues with the house’s foundation. This type of problem can cause doors and windows to stick in their frames, and can even affect masonry stairs, walkways, and patios.
If the cracks in your ceiling are accompanied by a bowing or warping of the ceiling, this indicates that there is a severe issue with the attic joists or trusses, and should be addressed as soon as possible. This type of problem can also lead to a collapsed ceiling.
It is also crucial to take notice of a ceiling crack that is accompanied by discoloration or water damage. This type of damage is often due to a water leak, and should be investigated and fixed as soon as possible.
Before beginning any work on your ceiling, lay down a tarp or piece of plastic to catch any debris that might fall off as you are working. Next, set up a ladder so that you can safely reach the area of the ceiling you are going to repair. Once you are able to work in the area, prepare the ceiling by spreading some joint compound over the crack, using a drywall knife. After the crack is filled, press a piece of insect screen into the wet compound and smooth it flat with your trowel. Once the crack is repaired, sand the surface and prime and paint it as needed to match the rest of the ceiling.
Water Stains
Water stains on ceilings aren’t just an eyesore; they may also be a sign of serious water damage occurring in the home’s walls. If you see water stains on your ceiling, it’s essential to find the source of the problem and fix it right away to prevent further damage. This means calling in a professional roofer, HVAC contractor, or plumber as needed.
While it may be tempting to just paint over water stains, this will do little more than cover up the stain and possibly even make the problem worse by encouraging mold and further damage to your ceiling and walls. Instead, your first step should be to identify and fix the leak causing the water stains. This will likely mean finding the source of the water stains in the ceiling, which is often in a location directly above an upstairs bathroom or other area.
Once the leak is fixed and the area is dry, you can tackle the stain itself. A quick cleaning with a bleach solution, made from one cup of bleach and three cups of warm water, will fade the stain and help remove any mildew, grease, or dirt that may be keeping primer and paint from adhering to the ceiling. You can then repaint the area with a ceiling paint that includes a stain blocking primer.
You can help to prevent water stains on your ceiling in the future by keeping moisture levels under control and performing regular inspections of structures. Improving ventilation with exhaust fans and dehumidifiers can also cut down on the humidity that causes condensation, which leads to water stains. Lastly, making sure to caulk cracks and joints regularly will keep moisture from seeping into the ceiling and causing problems. With a little care and attention, you can avoid ceiling damage caused by water stains by identifying and fixing the leaks quickly. By taking these steps, you can protect your home’s value and the safety of your family. For more information about repairing your ceiling, contact the professionals at MB Jessee. We can help you evaluate your ceiling repair needs and create a plan for fixing them.
Mold
Mold on the ceiling can be a serious problem. It can lead to dampness and damage other areas of the home. It also produces spores that can cause headaches, allergy-like symptoms and even respiratory problems. Therefore, you should deal with mold in the ceiling as soon as possible.
The first step in dealing with mold in the ceiling is to find and fix the source of the problem. Once this is done, you can start cleaning the mold. To do this, you should wear gloves and goggles, as well as a mask to avoid inhaling the mold spores. You can use a solution made of white vinegar, borate-based cleaner or a bleach solution to clean the mold. After applying the cleaner, let it sit for about 15 minutes and then scrub the area with a brush. Rinse and dry the ceiling thoroughly.
Another option for removing mold on the ceiling is to use a product called sugar soap. This is available at most DIY shops near the paint section. It is a fluorescent yellow liquid that can be used to get rid of any remaining contaminants, surface mold and grease. You can apply this using a sponge, brush or sprayer and leave it to dry for several hours. Once the area is dry, you should open the windows and wipe it down with a dry cloth to absorb excess moisture. You can also regularly spray the area with vinegar to prevent regrowth of mold on the ceiling.
If you have a sagging or discolored ceiling, it may be caused by water damage or a leak in the roof. It is important to resolve this problem promptly to protect the health and safety of your family. In addition, you should look for signs of dampness in other parts of the house, such as the walls and floors. It is also a good idea to install a dehumidifier and make sure the air in the room is well ventilated. It is also a good idea to put down tarps in the work area to protect it from dirt and other debris.
Mistakes
The ceiling is an integral part of any home and can be easily damaged by various factors. Some problems, such as cracks and water stains, may be easier to fix than others. However, it is important to keep in mind that any repairs done on the ceiling should be done by a qualified professional. In doing so, you will be more likely to avoid mistakes that could result in further damage to the ceiling and to your home.
One of the biggest mistakes that can be made in repairing a ceiling is failing to find the root cause of the problem. This can lead to further damage and costlier repair work. For example, if you notice a crack in your ceiling, it is important to determine whether the crack is due to settling of the house or any structural issues. A professional can help you identify the root cause of the cracks and recommend the best course of action.
Another common mistake is not properly preparing the ceiling before starting the repair work. The surface should be free of dust and debris, and the joints should be cleaned. It is also important to make sure that the drywall or plaster is securely attached and that there are no loose sections. In addition, it is recommended to prepare a tarp and some fans to prevent any water from falling on the floor below the ceiling.
It is also important to remember that the more water a ceiling absorbs, the more damage it will suffer. This can affect its structural integrity, compromise your safety, and even foster microbial growth. Therefore, it is essential to fix any water damage in the ceiling as soon as possible.
Finally, one of the most common mistakes is using the wrong type of material for a repair job. For instance, if you are attempting to repair a ceiling that has texture, it is important to use a plaster or texturized mud to ensure that the patch blends in with the rest of the ceiling. It is also important to properly sand the patched area to ensure that it is smooth.