Home » Posts tagged 'kitchen remodeling'
Tag Archives: kitchen remodeling
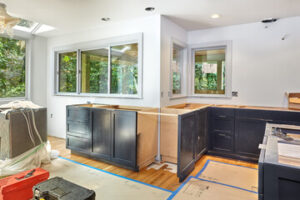
Cabinet Refacing Can Add Value to Your Home
Cabinet Refacing Sacramento is one of the best ways to remodel your kitchen. It saves you time and money, and offers a variety of veneer options.
This option is ideal for homeowners who want to make a dramatic change to their kitchen. It is a great choice for kitchens with a layout that works well and is in good condition.
Cabinet refacing is an excellent solution for those looking to update the look of their kitchen without spending a fortune. Using wood veneers or laminates, the cabinets are covered to give them a fresh new look and add a sense of luxury to your home. Cabinet refacing is less expensive than a full kitchen remodel, but it can still increase your home value.
The cost of cabinet refacing depends on the type of material you choose, as well as the amount of labor involved. For example, laminates are cheaper than wood veneers. You will also need to consider the type of hardware you want. Knobs and pulls can cost between $1 to $100 each, depending on the style and quality you select. Some refacing projects include the installation of new hardware, while others leave it up to the homeowner to supply their own.
Before the work begins, you should clean your existing cabinetry thoroughly. This will help ensure that all the surfaces are ready for the refacing process. A good quality cleaner and a soft cloth should be enough to get rid of any grime or residue that has built up over the years. You should also take this opportunity to check for any damage or wear. If the cabinet boxes are damaged, it is important to repair them before refacing them.
The next step is to sand the surfaces. This will prepare them for the adhesives and primer that will be used on them. It is also a good idea to sand down any major scratches or imperfections in the existing cabinets. You should use a medium-grit sandpaper to avoid creating scratches or dulling the surface. When you are done, vacuum or tack cloth the surfaces to remove any dust particles.
Finally, the installer will apply the veneers or laminate to the cabinet boxes. Once the material is applied, they will install the doors and drawer fronts. Then, the installer will apply a finish to protect the cabinets from water and other damage. Choosing a professional to reface your cabinets is the best way to ensure that the job is done correctly. Experienced professionals will be able to guarantee that the doors and drawers are level and square, and they will make sure that the veneers fit perfectly.
Time
Cabinet Refacing is an efficient way to give your kitchen a facelift without the expense of a complete renovation. This method keeps the existing cabinets intact, only replacing the doors and adding a veneer to the cabinet face frame. It typically takes between 3 and 5 days to complete, providing a quick turnaround that’s ideal for those looking to update their kitchen. However, it’s important to prepare the room properly before you begin to ensure the best results. This will save you time and money in the long run.
Choosing the right materials for your cabinet refacing project is key to its success. The material you choose will determine how durable your refacing will be, as well as its appearance and style. A variety of options are available, from classic wood to modern laminates and thermofoil. Each type has its own unique benefits, so it’s important to understand the differences before deciding on a material.
If you’re on a tight budget, you might be tempted to save money by using inexpensive materials like thin veneers. However, these low-quality materials are often not able to withstand the wear and tear of daily use, leading to cracking and damage. To avoid these issues, opt for high-quality materials that offer a blend of durability and aesthetic appeal.
Another important factor to consider is whether or not your cabinets were painted with lead-based paint. This material is dangerous to breathe, so it’s important to have your cabinets tested before beginning a cabinet refacing project. If your cabinets were painted with lead paint, you will need to have them encapsulated before you can reface them. Companies such as Sears and Alure can test for lead paint in your home, ensuring that your family’s health is protected.
While refacing is the most cost-effective option for kitchen renovations, it’s also the most labor-intensive. The process involves sanding and cleaning the existing surfaces of your cabinets, repairing any damaged areas, and priming the surface before painting. To reduce the amount of time needed to finish the job, hiring an experienced contractor is crucial. A professional will know how to handle the task safely and effectively, resulting in a beautiful new kitchen in no time.
Workspace
Cabinet refacing is an environmentally-friendly alternative to replacing your cabinets. The process involves changing only the visible parts of your cabinets, like doors and drawer fronts, while preserving the existing cabinet boxes. This saves money and minimizes the amount of waste produced during a home renovation project. It is also faster than installing a new set of cabinets, and requires less work to complete. However, there are a few things homeowners should keep in mind before hiring a professional to perform the task.
A Cabinet Refacing Professional’s Schedule
When choosing a handyman, it is important to consider their availability and schedule before scheduling the installation of your cabinets. This will help ensure that they can work around your existing commitments and that you are not impacted by any unforeseen circumstances. It is also important to communicate with your professional to discuss the scope of the job, including the specific cabinets that will be refaced and the materials you have chosen for the project.
The time it takes to complete a Cabinet Refacing project will depend on the size of your cabinets, your desired design, and the type of material you are using. A larger kitchen will take longer to reface than a smaller one, as there are more components to cover. Also, if your existing cabinets are in poor condition, you may need to perform additional repairs or upgrades before refacing them.
Choosing the right materials for your Cabinet Refacing project is essential to ensure that they are both durable and visually appealing. There are a number of options to choose from, including laminates and hardwood veneers, which are available in a variety of finishes. You can also customize the color of your cabinets by staining them, which adds a pristine finish to your surfaces and protects them from scratches, chips, and other common wear and tear.
Before beginning the refacing process, it is important to prepare your cabinets for work by removing the doors and drawer fronts, sanding the surfaces, and cleaning them thoroughly. This will ensure that the refacing material adheres properly and results in a professional-looking finish. In addition, if you plan to install end panels, it is important to measure each cabinet to determine the correct dimensions for the new panel.
Preparation
Many homeowners find that their cabinets are starting to look dated but can’t afford a total renovation. This is where cabinet refacing comes in. This is a process that swaps out the doors, drawer fronts, and hardware but keeps the cabinet boxes in place. It’s less expensive than replacing everything and can add value to your home.
Before you start the refacing process, it’s important to prepare the space properly. This will ensure a smooth and efficient renovation experience, minimize disruptions, and produce high-quality results. Here are a few of the key steps to take:
First, remove all the doors and drawers from the cabinet boxes. Label them and put them in a safe place. Then, clean the surface of the cabinets with a mild detergent and water mixture. Use a sponge or soft brush to clean away any residue left by soaps or cleaners. Afterwards, gently sand the surface of each cabinet to eliminate any rough patches. Finally, wipe down the surfaces with a damp cloth to remove any dust or dirt.
Once the cabinet box is ready, it’s time to begin preparing the veneers. Depending on the type of veneers you’re using, you may need to lightly sand them before applying the adhesive. If you’re using wood veneers, be sure to sand them to a smooth texture to help the adhesive adhere. If you’re using laminate, you’ll need to sand them even more, as their slick surfaces can cause problems with adhesion.
Before installing the new door and drawer fronts, make sure all of the existing hardware is still in good condition. If it’s in need of repair or replacement, consider purchasing some new hardware to match the style of your refaced cabinets.
Once the cabinet refacing is complete, it’s a good idea to give the cabinets a final coat of paint or stain. This will protect the finish and help it last longer. Finally, be sure to use a straightedge or level to ensure the doors and drawers line up correctly. With a little bit of time and effort, you’ll have beautiful, updated cabinets that will add value to your home.